Easy to install. Home security with ease.
Remo+ DoorCam2
Remo+ DoorCam2 overview
In this video today, we're taking a look at the Remo+ DoorCam2. This camera is one of the easiest ones that we have found to install. Essentially, all you have to do is hang it over your door, snug it up to the door, and you're pretty much done.
Now, it does come with screws that you can screw into the top of the door to hold it into place, but from using it, I've found that I didn't really need to do that, so it is just as easy as hanging it over your door.
Taking a look at the back of the box we see that this has easy installation, live view on demand, we've got push notifications, 2-way talk, high-quality night vision. We'll be testing that out. Dual power, so you can either do three D batteries, which do come in the box, or you can do a USB power supply.
We've got free cloud storage, HD videos, so that is 1080p, advanced motion sensors, customizable motion zones, multiple viewer access, so you can share this with up to five people, and it is also weather resistant. Okay. Now, that we have gone over the features of what this camera offers, let's take a look at what comes in the box.
Remo+ DoorCam2 what’s in the box?
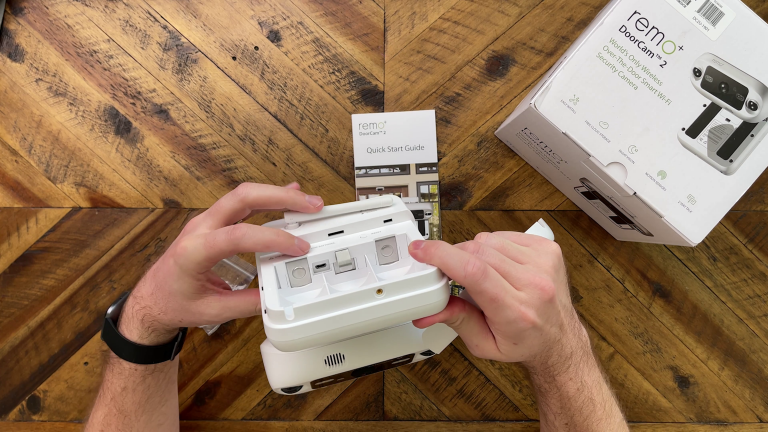
Okay. Here's everything that comes in the box. We've got our quick start guide. We've got a sticker, which I recommend that you probably don't use. You don't want people to know what specific brand you are using for a camera, just in case there is some kind of hack around it.
I'd probably just get a generic sticker if you can. Then we've also got a bag of screws. We've got an Allen wrench in here. We've got the camera. Then we also have batteries, which I am thankful that it came with batteries, because I typically don't have D batteries lying around.
Remo+ DoorCam2 camera
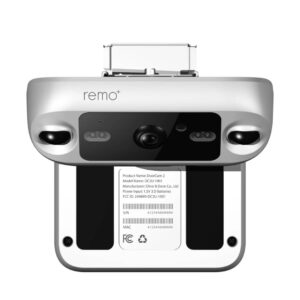
Here is the camera itself. This thing is actually quite a bit bigger than I was expecting. But on the back here, you open it up. This is where we're going to put the batteries in. This also does allow for USB power. Right here, there's a micro USB in the back, and then there's a hole down here, so you can run a cable out of there, and be able to power this up via a USB power cable. Under the panel here, we've got our reset button, and then we've got a screw on the bottom where you can screw that shut if you don't want people to open it. We've got our antenna here that folds out. We've got our status and Wi-Fi button. Looking underneath here, it does have padding under here, which is good, so hopefully it won't scratch up the door. We've also got adjustable rails on both sides, so that way it can fit your door better, go up snug against there. On the front here it looks like we have a speaker. We've got our cameras with lights and all the sensors up there. Looks pretty impressive. Can't wait to start using this thing. But that looks like everything that comes in the box. Let's go ahead, and get it set up.
All right. Setting up the camera is pretty straightforward. You're going to download the app, create an account, and then you're just going to add the device. It's pretty easy to do. You just have to follow the onscreen instructions. I've already gone through, and done those steps. Now, I'm just going to show you guys the app, and what's included. If you take a look at the app right here, we see that we've got the camera up in the top under live view. I can tap on that to bring up a live view, or below it, we've got recent activities. This is going to show all the recent activity of what has been happening at my front door. What I can do is I can click on the three dashes in the top left corner. That is going to bring up the menu, and then I'm going to click on devices, and select this device. We can then name the device whatever we want to. It shows battery level. We've got start a live view, so I can look at a live view from here. Video quality, for the sake of these tests I do have it set up for the best quality.
We've got motion sensor, tick that on and off. Save videos to the cloud. I've got that on. We've got motion push notifications. I have it just on standard. I felt that that was a good one. Motion sensor settings, so we've got high, medium, and low for those different sensors. We've also got night vision on, off, or auto. Then we've also got our speaker volume. Since my door is an eight foot door, I do have mine set to high. That way people can hear me. If we back out of here, and let's take a look at one of the clips at the front door. I'm going to go ahead, and click on the clip. If I tap again, it's going to show that we can either download the clip, pause the clip, share the clip, or delete the clip. Okay. Now, that we have gone over the basics of the app, let's go ahead and take a look at some of the demo footage, and see what kind of quality we're going to get out of this camera.
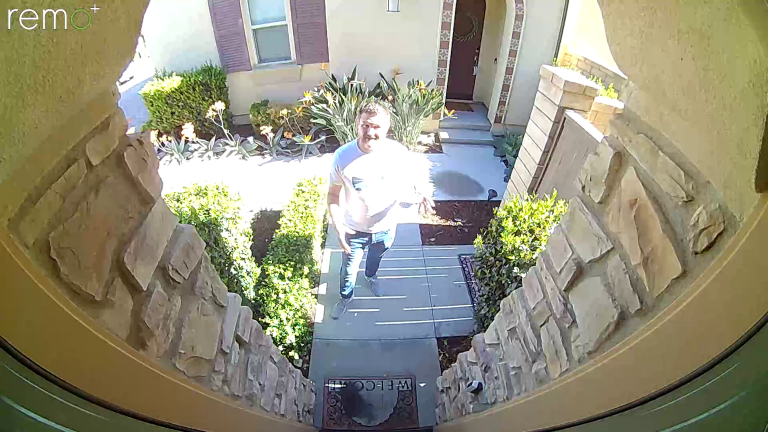
All right. Good morning, everybody. We are taking a look at a daytime shot with the Remo+ DoorCam, and this is what it looks like in the morning. I've got the sun shooting on me right now. You can see that I'm pretty faded out on this side. It is so bright out here with it trying to pick up all the dark around it, and it is hard to pick up some detail when the sun is shining directly on me. Now that we have seen what it looks like in the daytime, let's take a look at some other shots of what this camera can do.
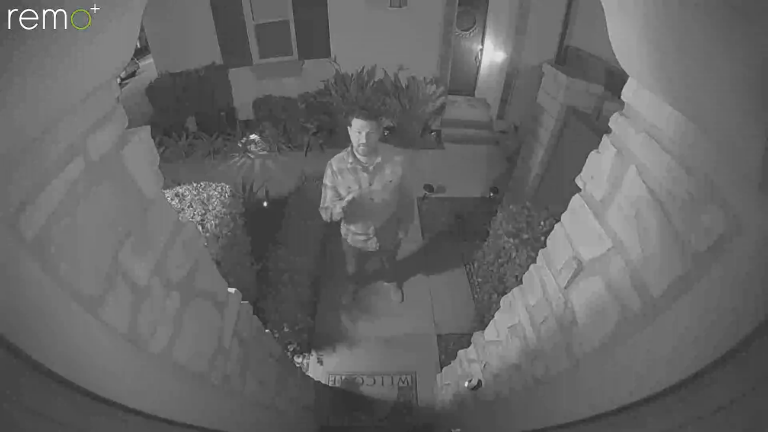
All right. We're testing out the camera right now with the lights on, so I got the patio light on to show you guys what it looks like with the light on. I'll go ahead and turn that off, and show you guys what it looks like with the infrared light on. All right. Now, this is what the video looks like with no lights on at all. We just have the infrared night vision on this camera. What do you guys think?
Amazon.com List prices (as of 11/14/22 2:01 PM MST)
Review and Wrap-up
All right. What did you guys think of the demo shots? I didn't think that the night shots were that great. They were kind of dark, especially when I didn't have that porch light on, and there was no light at all. I didn't find that the detail was that great in the night shots. Looking at the day shots, those were better, still a little grainy, and especially for the price point of this camera, I wasn't too impressed with it. But if you're limited to not wanting to screw something down or install something, then this is going to be a good option.
However, there is another option that I do like a little bit better than this one, and that is going to be the Ring Peephole Cam. That is a camera that is going to replace the peephole in your door. I did a full video review on that one. I can link it above for you guys to check out, but that one comes in at a much cheaper price. However, with that one, the biggest drawback is that you do have to sign up for a subscription. The subscription for the Ring is going to be about $30 a year, so comparing the prices between the two, you're going to be able to pick up that Ring Peephole Cam, and get two years of their subscription for the same price as this guy right here.
Another thing that I like about the Ring Peephole Cam too is that it brings the camera down to eye level, so you're going to get just a different perspective than this one that's going to be high above the door, but this one does come with free cloud storage. That is a huge plus to this camera right here.
What do you guys think about this camera? Let me know in the comments below. If you guys want to know more about this camera or any other security camera, check out the link below to reviews.org. If you guys want to see more from me, check out my YouTube channel Steve Does, where I do a lot of cool tech reviews. If this video is helpful, give it a thumbs up. Let me know that you liked it. As always, I want to thank you for joining me here at reviews.org. I will see you guys in the next video.
Related Articles


